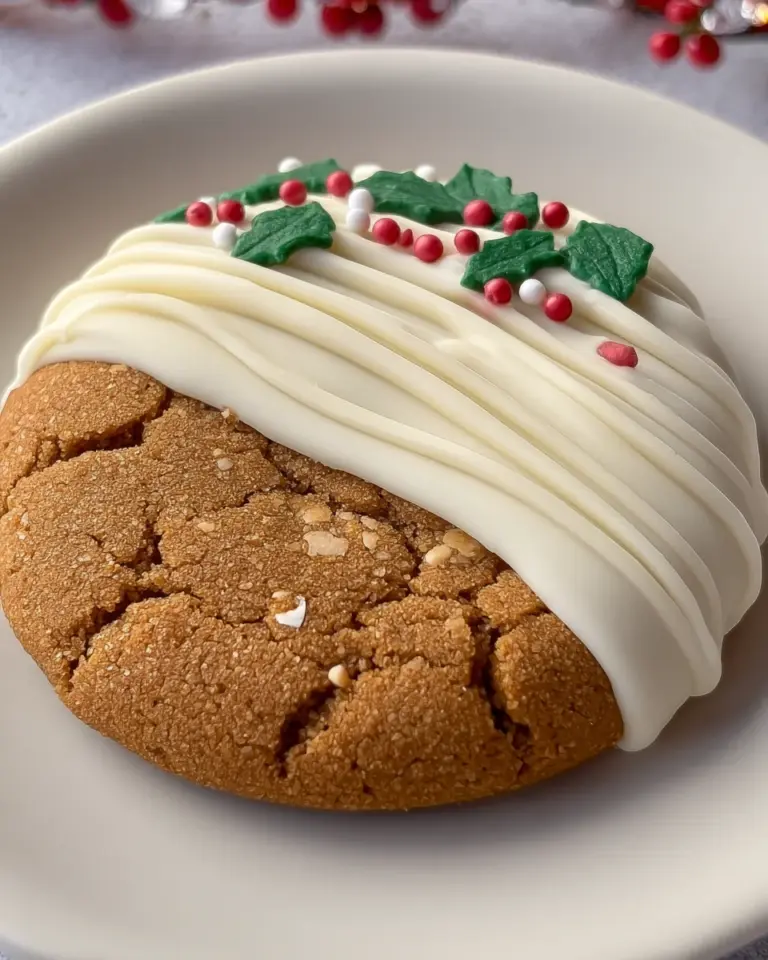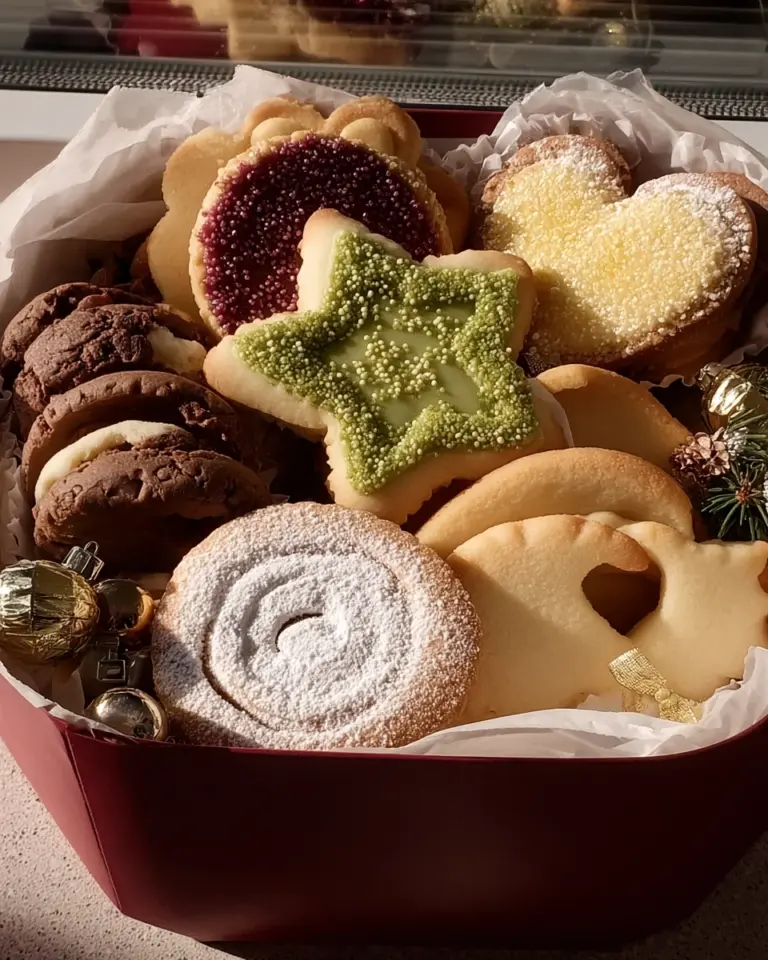
Christmas Royal Icing Cookies
Christmas Royal Icing Cookies are a festive delight that brings joy to the holiday season. These beautifully decorated cookies are perfect for sharing, gifting, or enjoying with friends and family. Not only do they taste wonderful, but they also offer a creative outlet for decorating with vibrant royal icing. Whether it’s for a holiday party or a cozy family gathering, these cookies will surely impress and spread festive cheer.

Why You’ll Love This Recipe
- Perfect for Decorating: The smooth surface of these cookies is ideal for intricate designs, making them fun to decorate.
- Family-Friendly Activity: Gather the family for a delightful baking session. Decorating cookies together creates cherished memories.
- Versatile Designs: Use various cookie cutters and food colors to create unique festive shapes and styles that match your holiday theme.
- Delicious Flavor: The combination of butter, vanilla, and almond extracts results in a rich flavor that everyone will love.
- Gift-Worthy Treats: Package these cookies beautifully to create thoughtful homemade gifts for friends and neighbors.
Tools and Preparation
To make the Christmas Royal Icing Cookies, you will need some essential tools. Having the right equipment makes the baking process smoother and more enjoyable.
Essential Tools and Equipment
- Rolling pin
- Cookie cutters
- Parchment paper
- Mixing bowls
- Electric mixer
- Piping bags and tips
Importance of Each Tool
- Rolling pin: Ensures even thickness when rolling out dough, which is key for uniform baking.
- Piping bags: Allow for precision in decorating, making it easy to create beautiful designs with royal icing.
Ingredients
For these delightful Christmas Royal Icing Cookies, gather the following ingredients:
For the Cookies
- 2 ¾ cups all-purpose flour
- 1 teaspoon baking powder
- ½ teaspoon salt
- 1 cup unsalted butter, softened
- 1 ½ cups granulated sugar
- 1 large egg
- 1 teaspoon vanilla extract
- 1 teaspoon almond extract (optional)
For the Royal Icing
- 4 cups powdered sugar
- 3 tablespoons meringue powder
- ½ cup water (plus more as needed)
- Food coloring (various colors for decorating)

How to Make Christmas Royal Icing Cookies
Step 1: Make the Cookie Dough
In a medium bowl, whisk together the flour, baking powder, and salt. In a large mixing bowl, cream together the softened butter and granulated sugar until light and fluffy. Beat in the egg along with the vanilla extract and almond extract if you choose to use it. Gradually add the dry ingredients into this wet mixture until just combined.
Step 2: Chill the Dough
Divide the dough into two equal discs. Wrap each disc in plastic wrap and refrigerate for at least 1 hour or until firm.
Step 3: Preheat the Oven
Preheat your oven to 350°F (175°C) while your dough chills.
Step 4: Roll Out the Dough
On a lightly floured surface, roll out one disc of chilled dough to about ¼ inch thickness. Use cookie cutters to cut out your desired shapes. Place these cookies on a parchment-lined baking sheet.
Step 5: Bake the Cookies
Bake in your preheated oven for about 8-10 minutes or until you see lightly golden edges. Remove from the oven and let them cool completely on a wire rack.
Step 6: Make the Royal Icing
In a mixing bowl, combine powdered sugar, meringue powder, and water. Beat on low speed until everything is well combined. Gradually increase to medium-high speed until stiff peaks form—this should take about 5-7 minutes. Divide this icing into smaller bowls and tint each with your chosen food coloring.
Step 7: Decorate the Cookies
Using piping bags fitted with different tips, decorate each cooled cookie with royal icing according to your design ideas. Allow them to dry completely—ideally overnight—before storing or displaying them.
Step 8: Serve and Enjoy
These stunning Christmas Royal Icing Cookies are not just delicious but also visually captivating! Perfect for sharing during holiday gatherings or as thoughtful gifts for loved ones!
How to Serve Christmas Royal Icing Cookies
Christmas Royal Icing Cookies are not just delightful treats; they make for an impressive centerpiece at any holiday gathering. Here are some creative serving suggestions to elevate your cookie experience.
Cookie Platter
- Arrange an assortment of decorated cookies on a festive platter. You can use various shapes and colors to create a visually stunning display.
Gift Bags
- Pack individual cookies into clear bags tied with ribbon. These make perfect homemade gifts for friends and family during the holiday season.
Cookie Decorating Station
- Set up a decorating station with plain cookies, royal icing, and various toppings. This interactive activity is great for kids and adults alike!
Dessert Table Addition
- Include your Christmas Royal Icing Cookies on a dessert table alongside other sweet treats. They complement cakes, pies, and other festive desserts beautifully.
Holiday Treat Box
- Create treat boxes filled with cookies to share with neighbors or coworkers. Personalize the boxes with festive decorations for an extra touch.
Cookie Swap Event
- Organize a cookie swap party where guests bring their own favorite cookies, including your royal icing creations. It’s a fun way to sample different treats!
How to Perfect Christmas Royal Icing Cookies
A few simple tips can take your Christmas Royal Icing Cookies from good to exceptional. Follow these guidelines to ensure your cookies turn out perfectly every time.
- Use Fresh Ingredients: Always check expiration dates on baking supplies, especially the meringue powder and powdered sugar, for the best results.
- Achieve the Right Consistency: For royal icing, aim for a smooth consistency that holds its shape when piped but spreads easily when flooded.
- Cool Completely: Ensure that your cookies are completely cool before decorating. Warm cookies can cause the icing to melt or slide off.
- Practice Piping: If you’re new to decorating, practice piping techniques on parchment paper before working on your cookies to build confidence.
- Avoid Humidity: High humidity can affect the drying time of royal icing. Try to decorate on a dry day for better results.
- Store Properly: Keep decorated cookies in an airtight container at room temperature to preserve their freshness and appearance.

Best Side Dishes for Christmas Royal Icing Cookies
While Christmas Royal Icing Cookies are a delightful treat on their own, they can be complemented by various side dishes that enhance the festive spirit of your gathering. Here are some suggestions:
- Hot Cocoa Bar: Set up a hot cocoa station with toppings like whipped cream, marshmallows, and peppermint sticks for a cozy beverage pairing.
- Cheese Platter: A selection of cheeses paired with crackers and fruits provides a savory contrast to sweet cookies.
- Fruit Salad: A fresh fruit salad adds brightness and can balance out the richness of the cookies.
- Spiced Nuts: Offer spiced or candied nuts as a crunchy snack that pairs well with sweet treats.
- Mini Cupcakes: These bite-sized delights come in various flavors and add variety to your dessert table.
- Eggnog: Serve traditional eggnog alongside the cookies for a classic holiday drink option.
- Gingerbread Men: Include gingerbread men as another festive cookie option that aligns perfectly with holiday themes.
- Savory Finger Foods: Consider serving small savory bites like stuffed mushrooms or cheese puffs to balance sweetness with flavor.
Common Mistakes to Avoid
Making Christmas Royal Icing Cookies can be delightful, but a few common mistakes can lead to less-than-perfect results. Here are some tips to ensure your cookies turn out beautifully.
- Ignoring the chilling step: Failing to chill the dough can result in cookies that spread too much while baking. Always refrigerate your dough for at least an hour to keep its shape.
- Not measuring ingredients accurately: Using incorrect measurements can affect the texture and taste of your cookies. Use a kitchen scale or measuring cups for precision.
- Overbaking the cookies: Baking them too long can lead to dry cookies. Keep a close eye on them; they should be lightly golden around the edges when done.
- Skipping the meringue powder in royal icing: Omitting this ingredient can cause your icing to lack stability. Always include meringue powder for a firm, glossy finish.
- Decorating before cooling: Applying royal icing too soon can cause it to melt and lose its shape. Wait until your cookies are completely cool before decorating.
Refrigerator Storage
- Store Christmas Royal Icing Cookies in an airtight container for up to one week.
- Place parchment paper between layers of cookies to prevent sticking.
Freezing Christmas Royal Icing Cookies
- Freeze decorated cookies in a single layer on a baking sheet until solid, then transfer them to a freezer-safe container.
- They can be stored for up to three months.
Reheating Christmas Royal Icing Cookies
- Oven: Preheat oven to 300°F (150°C) and warm cookies for 5-10 minutes.
- Microwave: Heat one cookie at a time on low power for about 10 seconds.
- Stovetop: Place cookies in a skillet over low heat for a few minutes, flipping gently.

Frequently Asked Questions
How do I make Christmas Royal Icing Cookies?
To make these cookies, mix flour, baking powder, salt, butter, sugar, egg, and extracts. Chill the dough, roll it out, cut shapes, bake, and decorate with royal icing.
Can I customize my Christmas Royal Icing Cookies?
Absolutely! You can change shapes and colors or even flavor your royal icing with extracts like peppermint or lemon for added variety.
What is the best way to store Christmas Royal Icing Cookies?
Store them in an airtight container at room temperature. For longer storage, freeze them as outlined above.
How long do decorated cookies last?
When stored properly in an airtight container, decorated Christmas Royal Icing Cookies last up to one week at room temperature and up to three months if frozen.
Final Thoughts
Christmas Royal Icing Cookies are not only delicious but also offer endless opportunities for creativity. You can customize their shapes and decorations for any holiday celebration. Gather your family and enjoy making these delightful treats together!

Christmas Royal Icing Cookies
- Total Time: 40 minutes
- Yield: Approximately 24 cookies 1x
Description
Christmas Royal Icing Cookies are the perfect festive treat to bring joy and creativity to your holiday celebrations. These beautifully decorated cookies not only look stunning but also taste delightful, making them a wonderful addition to any gathering. With vibrant royal icing, you can create intricate designs that capture the spirit of the season. Ideal for sharing with loved ones or gifting, these cookies provide a memorable baking experience for families. Gather your ingredients and tools, and embark on this joyful cookie-making adventure that will fill your home with warmth and cheer.
Ingredients
- 2 ¾ cups all-purpose flour
- 1 teaspoon baking powder
- ½ teaspoon salt
- 1 cup unsalted butter, softened
- 1 ½ cups granulated sugar
- 1 large egg
- 1 teaspoon vanilla extract
- 4 cups powdered sugar (for icing)
- 3 tablespoons meringue powder (for icing)
- Food coloring (for decorating)
Instructions
- Make the dough: In a bowl, combine flour, baking powder, and salt. In another bowl, cream butter and sugar until fluffy, then add egg and extracts. Gradually mix in dry ingredients.
- Chill: Divide dough into discs, wrap in plastic, and refrigerate for at least an hour.
- Preheat oven: Set your oven to 350°F (175°C).
- Roll and cut: Roll out dough to ¼ inch thick; cut shapes using cookie cutters.
- Bake: Place cookies on a parchment-lined sheet and bake for about 8-10 minutes until edges are lightly golden.
- Cool: Let cookies cool completely on a wire rack.
- Prepare icing: Mix powdered sugar, meringue powder, and water until stiff peaks form; divide and color as desired.
- Decorate: Use piping bags to decorate cooled cookies; let dry completely.
- Prep Time: 30 minutes
- Cook Time: 10 minutes
- Category: Dessert
- Method: Baking
- Cuisine: American
Nutrition
- Serving Size: 1 cookie (25g)
- Calories: 104
- Sugar: 8g
- Sodium: 40mg
- Fat: 5g
- Saturated Fat: 3g
- Unsaturated Fat: 2g
- Trans Fat: 0g
- Carbohydrates: 13g
- Fiber: <1g
- Protein: <1g
- Cholesterol: 15mg